Few things fill a kitchen like the smell of fresh homemade bread.
It’s the kind of smell that stops you for a moment. Warm, familiar, and comforting. The sort of scent that brings back memories of flour on the counter and someone standing at the stove wearing an old, worn apron.
Good bread has a way of doing that.
This post may contain affiliate links. That means if you click through and make a purchase, I may earn a small commission at no extra cost to you. I only share tools and products that I personally use and love in our homestead kitchen.
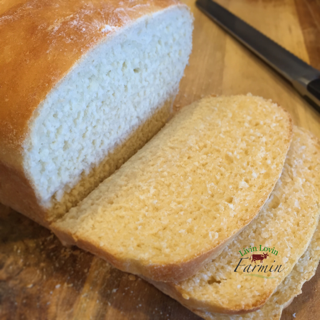
This whole wheat sandwich bread is the kind of loaf that quickly becomes part of the weekly routine.It slices beautifully for sandwiches.This loaf is soft enough for peanut butter sandwiches but sturdy enough for grilled cheese.
Best of all, it’s simple to make.
With the bread machine doing most of the work, this recipe only takes about five minutes of hands-on time. Around here, that makes the bread machine worth its weight in gold.

Ingredients
Method
- IF USING A BREAD MACHINE
- Place the milkwhey, butter and honey in a heat safe Pyrex and warm in the microwave for 40 seconds (not to hot! You don’t want to kill your yeast) or just enough to melt the butter. *( Alternatively you could do this on the stove top in a sauce pan.)
- Pour the warm wet ingredients into the bread machine bowl, layer the dry in the order giving.
- Turn on your bread machine and set to; 3 pound loaf and Whole Wheat.
- Close the lid, press start and wait for the most delicious smell ever.
*Tip.. if you have extra whey from cheese making, not only is this recipe a great way to use it up but it is also makes the bread so fabulous and fluffy!! Simply substitute the milk for 1 1/3 cups warm whey.
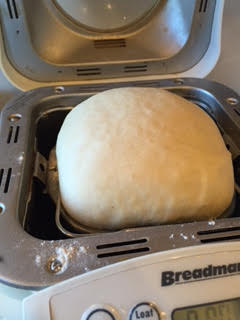
Using a Bread Machine to Knead and Rise the Dough
I personally do not love the taste of bread baked in a bread machine. However, I also do not always have time to knead and rise dough by hand. So I let the bread machine do the heavy work.
Using the machine as a dough mixer allows me to make several loaves at once. When one batch finishes kneading, I remove the dough and let it rise on the counter while the machine starts another batch.
Step 1 — Start the Dough Cycle
Complete steps 1–3 in the recipe.
Next, set your bread machine to the Dough setting. This cycle usually takes about 90 minutes.
Step 2 — Remove the Dough
When the dough cycle finishes, remove the dough from the machine.
Turn it onto a lightly floured counter and knead it briefly.
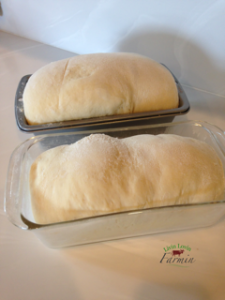
Step 3 — Second Rise
Place the dough into a greased and floured bread pan.
Cover the pan with a flour sack towel and allow the dough to rise for about 45 minutes, or until it has doubled in size.
Step 4 — Bake the Bread
Preheat your oven to 350°F.
Bake the bread on the middle rack for 30 minutes.
For softer bread, place a pan of water on the bottom rack of the oven while baking. The added steam helps keep the loaf moist.
Why I Don’t Bake Bread in the Bread Machine
Bread machines are wonderful tools. They save time, knead the dough beautifully, and make homemade bread far easier for busy kitchens.
However, I personally don’t love the flavor or texture of bread that is baked entirely in the machine. The crust tends to be thicker, and the loaf shape can be a little awkward for sandwiches. Instead, I use the bread machine as a dough mixer and kneader. It handles the hard work while I finish the bread in the oven.
This gives me the best of both worlds:
- perfectly kneaded dough
- consistent rising
- a classic loaf shape
- soft, sliceable sandwich bread
It also allows me to make several batches in a row. When one batch finishes kneading, I pull the dough out to rise on the counter and start another.
Around here, that makes the bread machine worth its weight in gold.
Few things taste better than warm homemade bread with fresh butter melting into the crumb. If you’d like to try making butter yourself, you can follow my guide here: How to Make Homemade Butter.
Making This Bread Without a Bread Machine
If you do not have a bread machine and would prefer to make this bread by hand, follow the instructions below.
In a large glass mixing bowl, combine the warm whey or milk, honey, and melted butter. Whisk well and set aside.
In the bowl of a stand mixer, combine the dry ingredients and mix well. Switch to the dough hook attachment.
Slowly add the wet mixture to the dry ingredients while mixing on low speed. Once the dough begins to come together, increase the speed to medium and knead for about 5 minutes.
Move the dough into a well-buttered bowl, cover it with a flour sack towel, and allow it to rise until it has doubled in size.
Punch down the dough and knead it for about 5 minutes. Form the dough into a loaf and place it into a buttered and floured loaf pan. I prefer THIS one.
Preheat the oven to 350°F.
Allow the dough to rise again in the loaf pan until it has doubled in size. Once risen, bake the bread for 30 minutes.
Allow the bread to cool completely before slicing.
Once sliced, wrap and freeze the bread if desired. This loaf freezes beautifully and thaws quickly, making it perfect for keeping homemade bread on hand.
Thats it. Delicious. Homemade sandwich bread. Did I mention that it freezes super awesome? Because it does!
I use THESE bread bags to wrap and freeze our bread. They are quiet thick and I don’t have to worry about freezer burn, they also are large enough for big loaves. If you avoid plastic in your home, then try these Beeswax Bread Bags.


I keep filling this all out and it comes back up empty help!
What a lovely and simple recipe – thank you! I love the idea of adding whey to bread dough. Seems like add protein and possibly beneficial bacteria – I wonder how much would survive the heat. Hmm…
Why PLASTIC bread bags??? Can’t find waxed paper bread bags for my freezer>>>
I use plastic over aluminium foil. Maybe the less of the two evils. I’ve never found wax paper bags, however. I did include a link in the post to Attainable Sustainables linen bread bag post. That would be an excellent alternative.
I love a good bread machine recipe. I make pizza dough with mine all the time. Can I substitute white flour in this recipe?
You sure can! Add 2 Tablespoons more white flour.